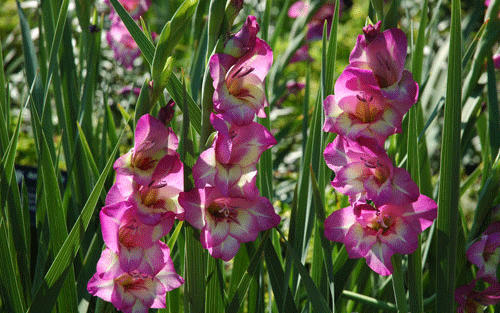
Gladiolus, or Glads as they are often referred to, add greatly to the summer garden with their tall spikes of flowers that come in every color imaginable. They’re also the king of the cut flower world. You can put together a nice arrangementof glads in a vase with no prior flower arranging experience!
Gladiolus, like baseball players, are the boys of summer. They bloom well over the summer but won’t survive the winters in areas where the ground freezes. Thus, they will need to be dug up and stored in a cool, dry place over the winter.
The genus Gladiolus comprises 260 species, 250 of which are native to sub-Saharan Africa. The name gladiolus comes from the Latin word for sword, because of their sword-shaped leaves, hence the nickname, sword lily. In the center of these make-believe swords arise the flower stems, packed full of beautiful flowers.
When to Plant Gladiolus

Plant gladiolus corms (botanically speaking they’re corms, not bulbs) in the spring as soon as the ground can be worked up. They are long lived flowers and to make the best of their blooming cycle, it’s best to stagger the planting over a few weeks to ensure a long summer filled with their delicate colors.
Where to Plant Gladiolus
Plant glads in full sun, especially in the northern states where the summers are cooler. Glads can be grown in light shade in the southern locations of the country. They prefer loamy soil so if you have compacted or clay soils, you’ll want to amend with compost-rich organic material. Your glads will love you for it!
Planting Depth for Gladiolus Corms

Gladiolus corms are planted at a depth of three to six inches. For larger corms, plant at the deeper end of that range. The tips of the corm should be pointed upward.
Spacing of Gladiolus Corms
Glads should be spaced 3-6 inches apart. Some enthusiast plant glads in rows about two feet apart for the effect of their beauty.
How to plant Gladiolus
Let’s face it, most bulb planting methods have us spending a lot of time bending over or on our knees. The ProPlugger 5-IN-1 Planting Tool allows you to do most of the hard work of digging your bulb planting holes from a standing position.
To pull plugs, slide the 2″ or 4″ metal depth ring onto the bottom of the main tube to set the desired depth of the planting hole. Or to dig a 6″ deep hole, no depth ring is needed.
(Step, Twist and Pour) Step down on the foot pegs until the depth ring bottoms out against the ground. Give the 5-IN-1 a slight twist to break the soil plug free and pull straight up on the handlebars. To empty the plugs, simply turn the plugger upside down and pour the plugs out of the top of the tube.
The soil gets stored inside the tool as you work, enabling you to dig over a dozen planting holes, one right after another. Place the bulb in the planting hole, pointed tip facing upward. Fill in the hole with the soil you removed with the 5-IN-1. Firm the soil over the bulb with your foot.
Feeding and Fertilizing Gladiolus
When the leaf tips begin to poke out of the ground, apply a 5-10-10 fertilizer. About the time of flowering, top dress with a 0-0-10 or 0-0-50 fertilizer. Mulching around the plants with aged compost or well rotted manure will achieve the same effect as a light feeding of fertilizer.
Tips for Storing Gladiolus Corms
Sometime after the first frost in the fall, but before the ground freezes, dig up your glads and examine the corms. Discard the original corm and keep the larger corms that have grown over the summer. They will be located just above the original corm. Cull out the largest of the corms, which should be about 1-2 inches in diameter. Allow the corms to dry out for a few days in temperatures hovering around 65ºF then place them in a cool (35º-45º F), dark, airy room or cellar. They store best on an open rack where air can circulate freely between the corms.