Read this article on how to plant Tulips and Daffodil Bulbs
Or, watch the video below
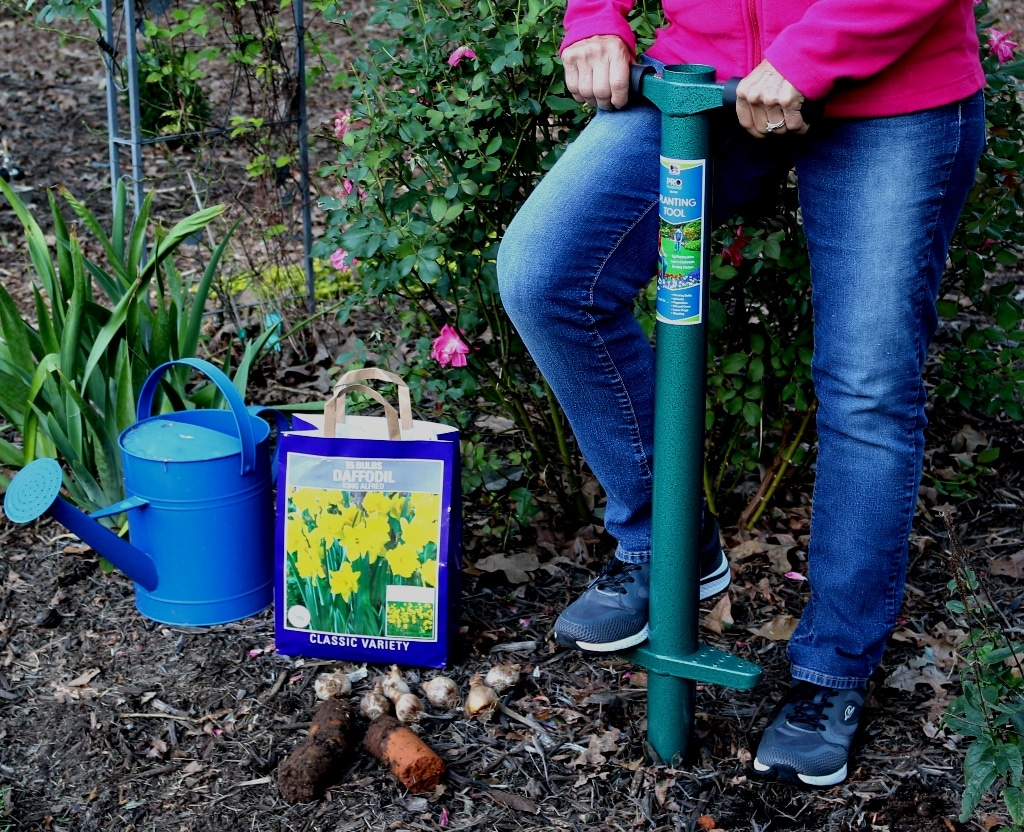
Today we’ll be planting daffodils and tulips to demonstrate just how easy planting our fall and spring bulbs can be with the right tool. The rule of thumb for planting bulbs is that they should be planted 2 – 3 times as deep as they are tall. So for these tulips we’ll be planting, they need to go 4 to 6 inches deep, while these larger daffodils will need to go 6 to 10 inches deep, which if we were planting the old-fashioned way, would mean some serious work and a lot of bending over. But not for us.
We’ll be using the 5-IN-1 Landscape Plugger from ProPlugger, which comes with these adapter plate to help gauge the depth of the holes that we dig. We’ll start with this one that has a “4” stamped on it because our tulips will need to go 4 inches deep. This will set the depth perfectly. There’s also a 2 inch adapter plate that comes with it. It’s used for planting smaller bulbs and for some other applications around the landscape which we’ll touch on later.
Now this planting area that we’re going to be using has not been cultivated in the last ten years or so, so we’re likely to run into some roots and rocks. That’s ok. If we hit one, we’ll simply move over and dig our hole. One other note before we begin: we’ve had very little rain recently and the soil was pretty dry, so I ran a sprinkler over this area a couple of days ago to moisten the soil, which makes a huge difference when dealing with any tool.
For a more natural look, I’ll just drop these tulip bulbs on the ground and plant them more or less where they land. Next, we dig our planting holes. Notice how my body weight and gravity do most of the work, allowing me to stay in a more comfortable upright position. The soil plugs get stored while i work and when it’s time to empty, I simply turn the plugger upside down and they slide right out.
We’ll screen any rocks and debris from the soil and mix in some organic compost to give our bulbs plenty of nutrients to feed on. We’re adding some bulb fertilizer and we’re using the 5-IN-1 as a planting guide so we don’t have to bend over to do it. We’re also adding a pinch of soil so that the bulb doesn’t rest directly on the fertilizer, dropping the bulb with the pointy side or the eye to the sky.
We’re ready to move on to the larger daffodils which will need to be planted a little bit deeper. We’ll remove the adapter plate from the ProPlugger which now lets us dig a full 6 inch deep hole. And for the extra depth needed for these larger daffodils, we’ll first loosen a few inches of this topsoil and skim it out using a flat shovel. This top layer is usually pretty loose and easy to remove. Now that we’ve skimmed down several inches, we’re ready to dig down the remaining 6 inches with the 5-IN-1, and just like before, we’ll let our body weight and gravity do most of the work.
This time we’ll push down until the foot pegs touch the soil. Okay I think we’ve got our deeper planting holes finished. Now we’ll repeat the steps we used earlier with the bulb fertilizer and pinch of soil and we’ll drop in the bulbs. The last step is to backfill all of the planting holes with the screened and amended soil and we’re done!
The new 5-IN-1 XL takes most of the work out of planting our spring and fall bulbs, but that’s just the beginning. It also makes a great planting tool for year-round annuals. It makes quick work as a lawn plugger for either cutting and planting sod plugs that you purchased or transplanting your own lawn grass to repair damaged areas around the yard. A great weeding tool for those hard to kill weeds like dandelions and wild onions and thistle.
Even as a drip edge fertilizing tool for your trees. It’s definitely a year-round landscape tool that won’t sit in your shed gathering dust. The all-steel constructed 5-IN-1 Landscape Plugger from ProPlugger. It’s made right here in America and it’s made to last.